TUTORIAL: BASIC RAW PROCESSING FOR LANDSCAPES
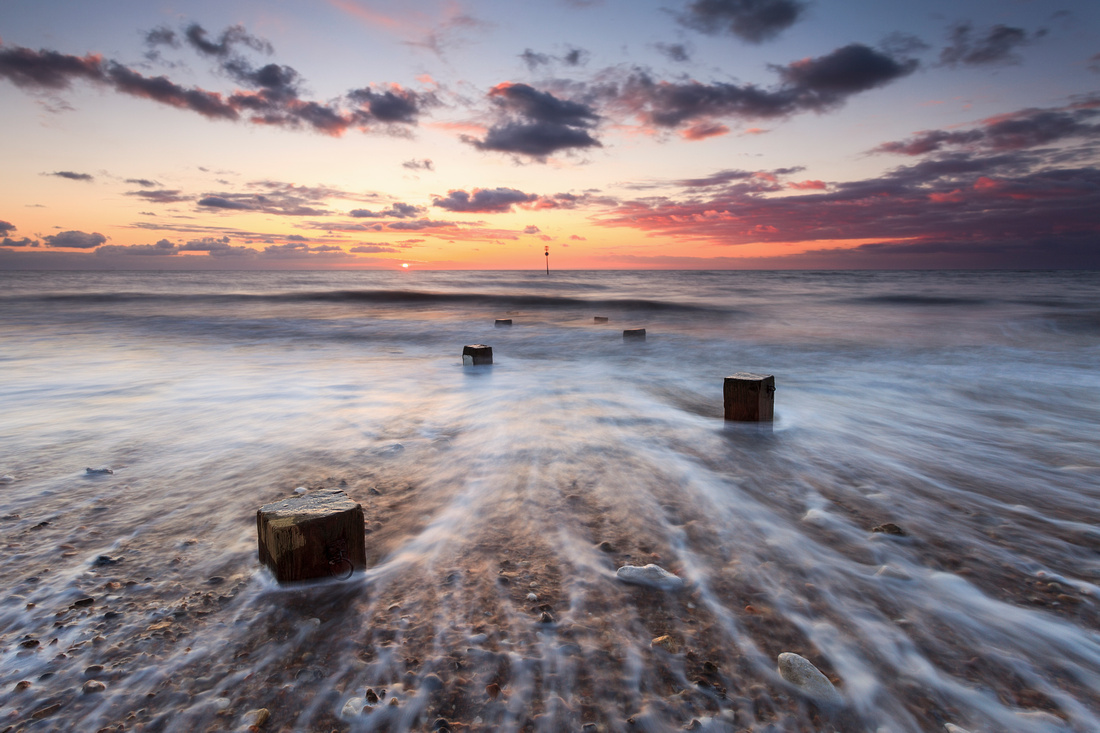
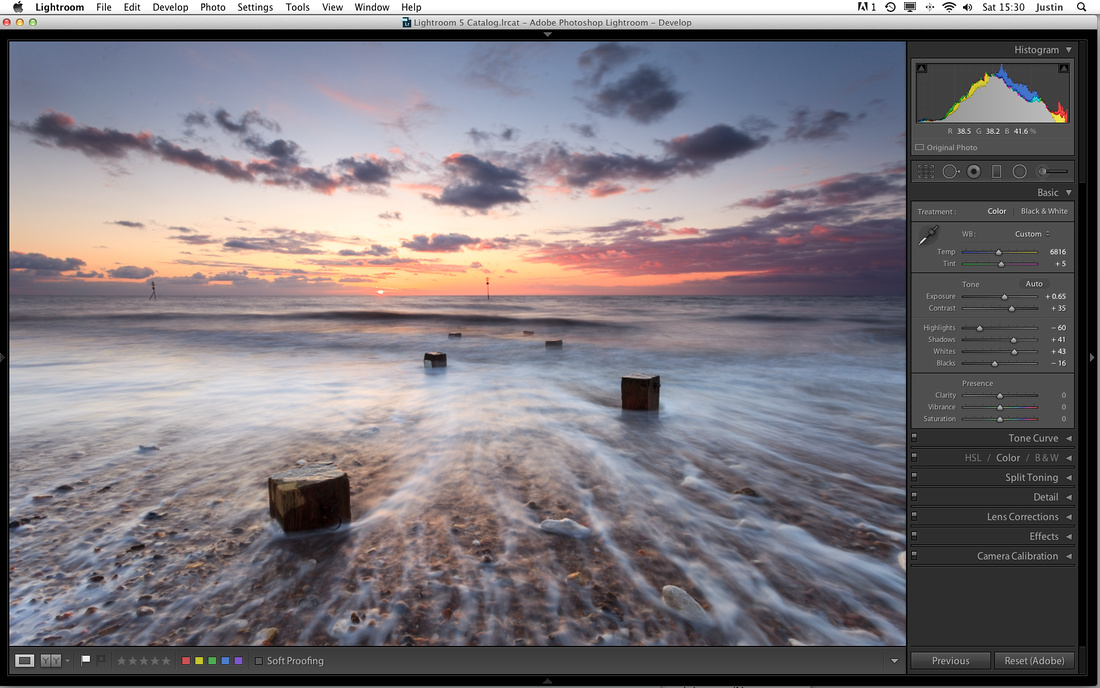
 After - The final image
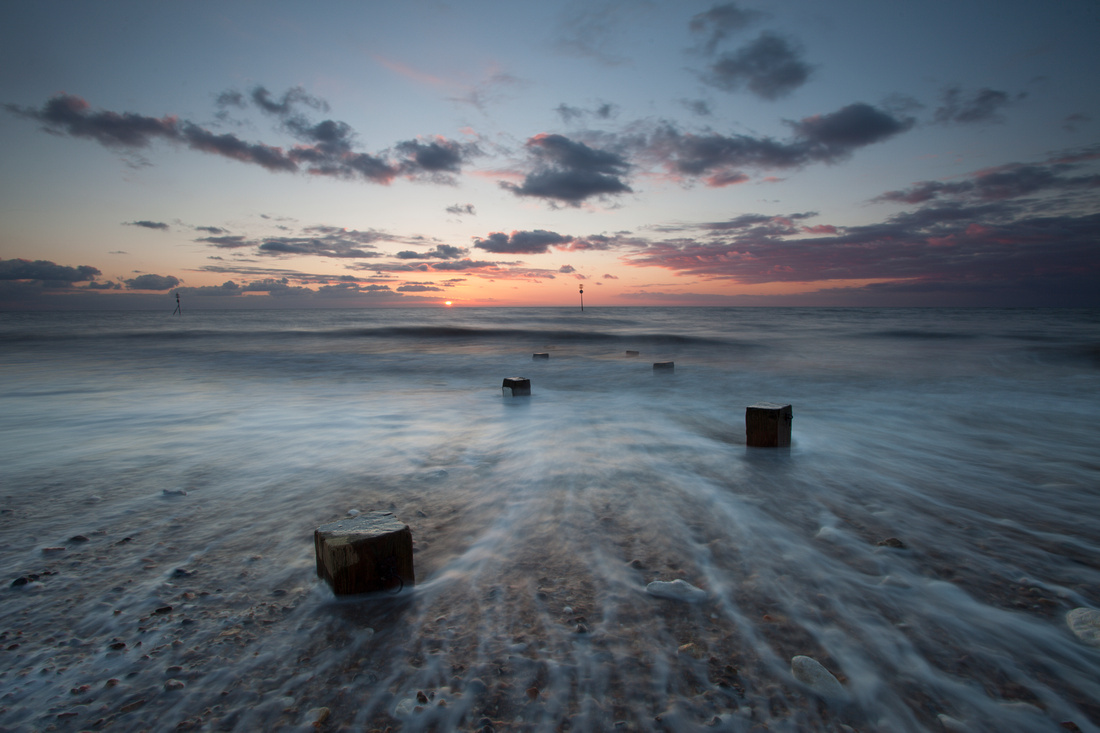
Before - The original RAW file
Before I begin processing I like to have an idea, however vague, of how the finished image will look. It doesn’t always go to plan but it helps get me started. Adobe Lightroom is at the heart of my workflow, as well as keeping my image library organised, it’s also where the bulk of my editing takes place. If however I want to make selective adjustments then I prefer the flexibility of Photoshop’s adjustment layers and masks.
I try to emphasize the atmosphere in an image while still keep things looking natural. Although I generally only make the sort of exposure adjustments and minor cloning you see here, I believe it’s the finished image that’s important rather than how it was created so I’m not averse to removing larger distracting elements or blending exposures to achieve the result I want. Obviously I prefer to get the job done in camera, but it’s not always possible. In those cases it pays to keep in mind what you can do on the computer later while you are still behind the camera.
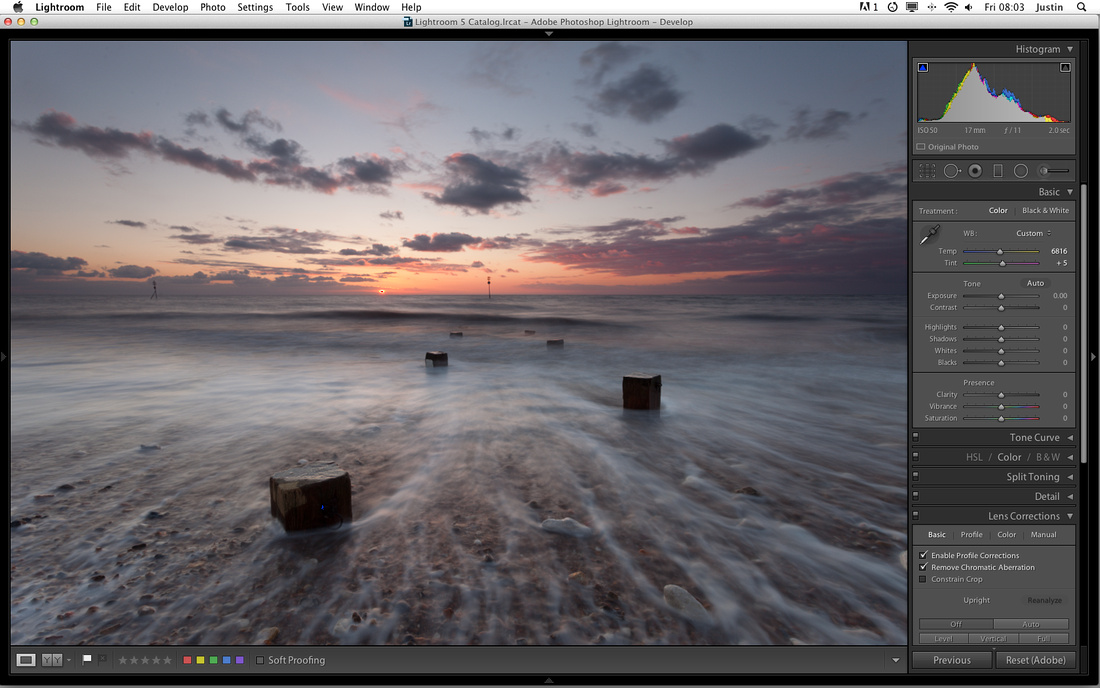
Step 1
Step 1 - Lens corrections
First thing to do once the raw file is open in Lightroom is sort out any distortion and colour issues. My import preset adds a small amount of colour noise reduction and ticks enable profile correction and remove chromatic aberration in the lens correction box to correct any lens distortion. Sometimes some manual correction is also needed but not here. I then move up to the crop and straighten box and use the angle tool to straighten the horizon.
Following this I set the white balance. White balance is an adjustment that I prefer to do by eye and set the temperature to emphasize the mood of the image rather than trying to find the most ‘accurate’ setting. I usually start by trying auto or one of the presets and tweaking it where necessary, in this case I cooled down the cloudy WB slightly.
Step 2
Step 2 - Exposure adjustments
The next step is to adjust the exposure. The raw file, as is often the case, is looking flat and lacking in contrast but this one is also slightly underexposed.
Starting at the top I raise the exposure and contrast to brighten and add a bit of punch to the image. Moving down I use the whites and blacks sliders to take the histogram out to the edges which adds further contrast before jumping back to the highlights slider to take the edge off the brightest areas. Things are already looking better but the posts are a little too dark so I use the shadows slider to bring out some detail, but not so much that they start to look unnatural.
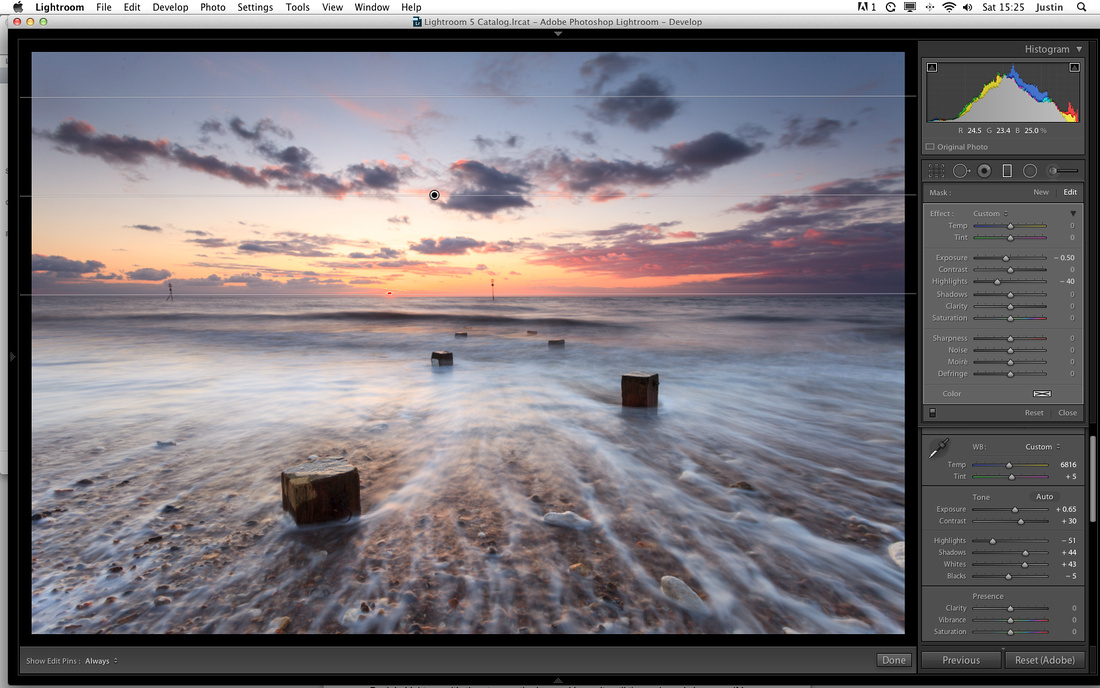
Step 3
Step 3 - Graduated filter
The exposure adjustments have left the area at the top of the sky a little bright for my liking and my eye keeps wandering up to that brighter area. This is easily fixed using a graduated filter with a negative exposure value over the top area. I could probably have got away with using a slightly darker ND grad filter on the sky at the capture stage but I find it harder to lighten a sky where I’ve used a filter that is too dark without it looking unnatural than the other way round so I often err on the side of caution. As long as the filter is strong enough to retain all the detail in the sky I’m happy.

Step 4
Step 4 - Cloning, dodging and burning
I need to jump to Photoshop for the next adjustments, these are all changes that could be made in Lightroom but the tools in Photoshop allow more control. I find the post near the horizon on the left and the white rock that cuts the edge of the frame on the right distracting so I use content aware fill to remove them before using the spot healing brush, also set to content aware, to remove a few sensor dust spots visible in the sky.
While in Photoshop I also use some dodging and burning to further bring out the foamy streaks in the foreground. Adding a new layer, with a 50% grey neutral background set to overlay mode, I can now use the dodge and burn tools without it being permanent.
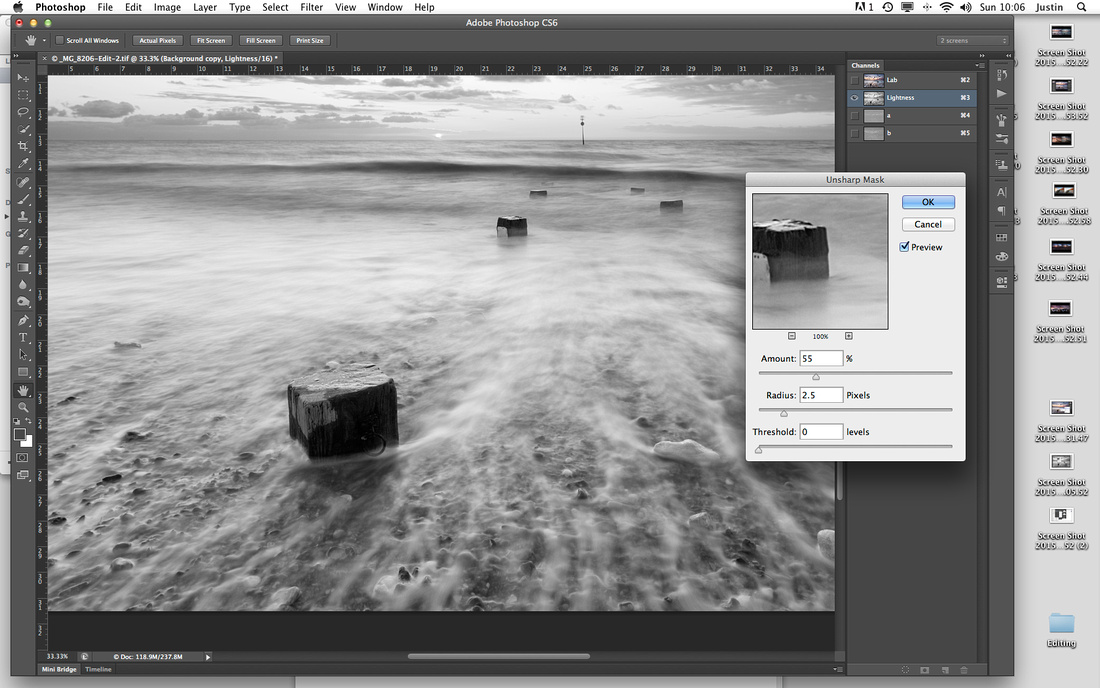
Step 5
Step 5 - Sharpening
I like to sharpen my images in Photoshop before saving and returning to Lightroom.
There are countless sharpening methods but the one I employ most often uses LAB colour. I convert the image to LAB mode, duplicate the background layer and with that selected apply an unsharp mask to the lightness chanel. As the sharpening has been applied to a duplicate layer, it is then possible to use a layer mask to mask out any areas that you don’t want to sharpen. I particularly like selective sharpening as it helps bring the viewers eye to what is important in the image while the areas of the image that should be soft, stay soft.
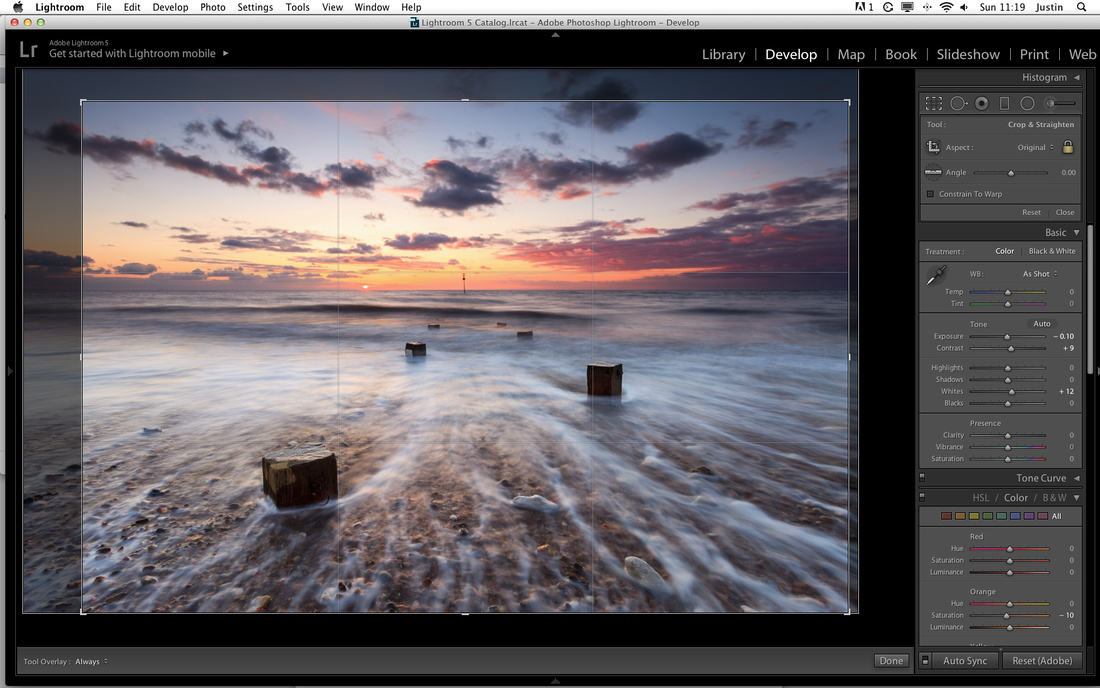
Step 6
Step 6 - Crop and finishing touches
Back in Lightroom it’s time to crop the image. I leave it until the end purely because if I crop before doing the edits in Photoshop then the crop becomes permanent whereas cropping in Lightroom is non-destructive giving me the flexibility to change my mind or re-crop for different purposes.
I also leave any saturation adjustments until this stage in case any of the Photoshop adjustments affect the colours. In this case I’ve reduced the saturation on the orange tones in the sky which had become a bit too strong. I’ve also made a couple of small tweaks to the exposure.
The final step is to leave the image alone for a couple of days so I can have a last look with fresh eyes to double check I haven’t overdone things.
Article originally published in Amateur Photographer magazine, February 2015